


- How To Void A Check In Quickbooks?
- What Do You Mean By A Void Check?
- Steps To Void A Check In Quickbooks Online
- What Are The Methods To Void A Paper Check in Quickbooks?
- How To Void A Check In The Desktop Version of Quickbooks?
- How To Void A Blank Check In Quickbooks?
- What Are The Key Differences Between Deleting And Voiding A Check?
- The Bottom Line
How To Void A Check In Quickbooks Online?

How to void a check in QuickBooks – It is a common question asked by members of the accounts team in any organization. For instance, you have made mistakes during paying our colleagues, vendors, and clients while operating QuickBooks.
From the questions of accounting professionals, the majority of their concepts are not up to the mark regarding this. As a result, today, we will focus on how you can void a check in QuickBooks.
How To Void A Check In Quickbooks?
In this segment, we have explained in detail how to void a check in QuickBooks. First, before hopping on to the steps directly, you must clarify what does Void Check means.
What Do You Mean By A Void Check?

Assume that you have mistakenly issued a check to a person whom you were not supposed to. Or you have entered incorrect fund amounts in the check.
Furthermore, after issuing the check, suppose you have realized that there are high chances to bounce. It is because the amount mentioned is more compared to the current account balance. All these might seem to be minor mistakes, but they can bring bad luck to your business in no time.
What to do then? Are you having sleepless nights thinking these? Not to worry anymore because we have brought a unique solution to the issues – ‘Voiding checks in QuickBooks online.‘
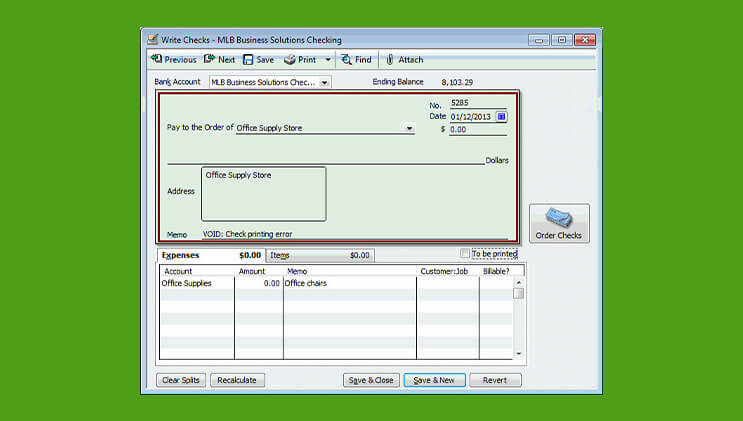
The void check simply refers to the change of amount on the bill to zero. But the check receives a tag of Voided transactions. However, the rest of the details, such as check number, issue date, ad payee’s name, remain untouched.
To be more precise, a check having the word Void on it prevents anyone from filling it out. In addition, you may not be able to fill it out for making a payment. Voided checks are necessary to set up an automated clearinghouse, direct deposit, and pay electric bills.
Steps To Void A Check In Quickbooks Online
Voiding checks is a conceptual yet straightforward procedure. You require to have an initial idea before progressing to do it. Here are some easy steps of how to void a check in QuickBooks Online:
- Open the QuickBooks online accounting tool (software)
- Click the Accounting tab at the top left corner
- Then, click the Chart of Accounts again from the top left
- Select the bank account that issued the check originally
- Then, hit the View Register option
- Look for the check that you would like to void. After that, tap to make it highlighted
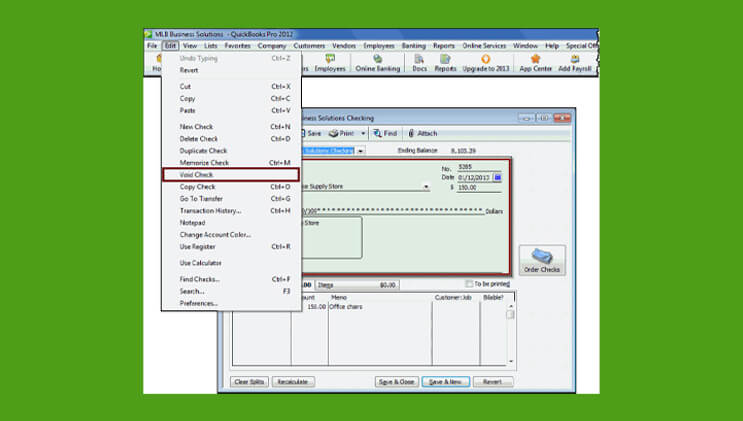
- Now select the Edit and then hit the More option.
- Lastly, click the Void option and confirm it by clicking on the Yes.
What Are The Methods To Void A Paper Check in Quickbooks?
Check out the required methods to void a paper check in the Quickbooks Online below:
- After opening the QuickBooks software, select the Banking and then click the Write Checks option.
- Under the expense section, select the account from which the paper check was issued.
- Enter the issued date along with the check number into the given fields
- Then proceed to enter the payee name in the section – ‘Pay to the order of.’
- Now fill the amount field, select Edit, and then Void Check.
- A message would appear asking you to hit Yes if you wish to void the check with the current date. You can also click No if you want to cancel the check using its actual issue date.
- Nonetheless, if you click No, then the organizational journal will not update, although the check would show as voided.
- In the end, upon choosing the Record option, you will void the check ultimately.
How To Void A Check In The Desktop Version of Quickbooks?
Now that you know the various steps of coding a check concentrate on how to void a check in QuickBooks’s desktop version.
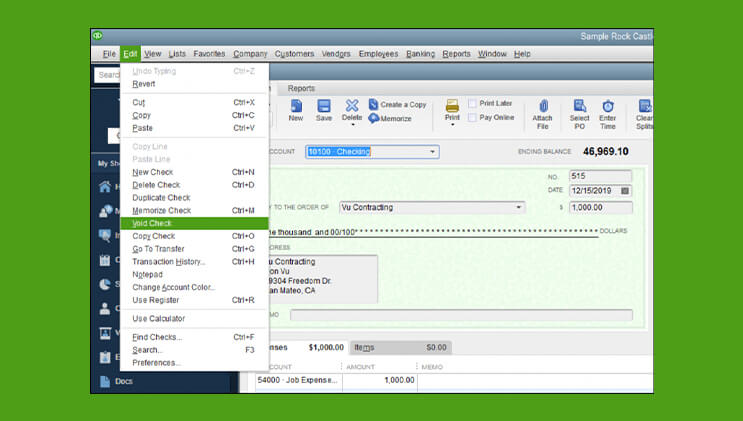
- Under the write check window, open the check that you wish to void
- Select Edit and Void Check from the top part of the menu bar
- To move further, select the Save option at the top of the Main tab of the Write Check window
- A new window would come up asking how would you like to conduct the voiding the check
- The visible option would depend on the related transactions and the type of the check.
- After reading each option ad its associated descriptions carefully, select what is best for you and confirm
- And there you go! Your check is voided.
How To Void A Blank Check In Quickbooks?
In addition to a paper check, accountants should possess the experience of how to void a blank check in QuickBooks. The methods are as follows:
- Select Use Register from the Blanking
- Then select the bank account
- Generate a statement with 0.00 in the amount section
- Enter the name of the payee. Then allocate expenses field if needed.
- Select the Edit option and Void check.
- Save and Close to end the procedure.
What Are The Key Differences Between Deleting And Voiding A Check?
If you delete a check, you will remove the entire transaction history. On the contrary, if you void a check, the amount changes to zero, although other attributes remain the same.
The Bottom Line
To summarize, the accounts payable team of an organization always remains busy with loads of work. Many do not even have a fair idea about how to void a check in QuickBooks accurately.
However, as the department is oriented to profitability, they are responsible for knowing how to void a check in the Quickbooks online. This article will bring clear insights for them and will make them do the entire procedure effectively.
As you have a clear idea now, go and complete the entire procedure of Voiding a check in the QuickBooks Online successfully.
Read Also:
Share this article:


